Monday, April 30, 2012

Organizing Activities

Here is a quick shot of my "Activities Corner" and perhaps you can get an idea or two of some storage options.
You can see my dice, and some of my 'Fix the Sentence' cubes. I hang some larger board games that I made (on posterboard) on the wall, one behind the other.
One of my best finds were these plastic "chinese take-out food" boxes (from the Dollar Tree, of course).  I love that they are lightweight, come in different sizes and hang easily on hooks on the wall.  They are easy for my students to transport to different areas of the room as well.
Here is my suggestion. Whenever you create something for your classroom, think of how many ways it can be used and how it can be created/modified so that you can get the most use out of it.
All of my activity boxes have labels on the front. I try to keep the labels a consistent size.  I attach the labels to the containers with velcro.
They stay on securely, yet I can easily change the game or activity inside and change the name of the center with a quick switch of the cards, and not have to make a new container. I can store the pieces from the center that I am removing in a zip loc bag along with it's label so that it is ready to go for the next time I want to use it.
So scope out some sturdy, multi-sized containers and make them work for you in many different ways. Soon you will have a wonderful array of great containers for your activities, and not have to make them over and over again.
Chery

Saturday, April 21, 2012

Flying dice -- no more!


Here is one way I help my "enthusiastic" firsties keep a hold of their dice during games, and make the whole rolling and passing a bit calmer. I purchased some small plastic containers from the Dollar Store. I think there were 10 in a package for $1.00. I also purchase extra dice from the same place (also 10 in a pack for $1).

I then added two dice (die?) to each container and glued the top on. Now whenever a student or students need a pair of dice they just grab one of these handy containers. They shake the container and them place it, top down, on the table. They can easily see what numbers they have "rolled", and it makes it simple to pass the entire container to the next player. I still sometimes have overly enthusiastic players (usually boys) slam the container down as they turn it over, but for the most part, it is relatively quiet, quick and no more flying dice! Yippee!
Chery


Tuesday, April 17, 2012

Classroom Center Management

I thought I would share how I manage centers in my class. Whether you call them centers, stations or tubs, keeping track of who is where and who has done what can be daunting.
Here is my system.
I make a checklist with student names on it (I like mine in abc order by first name) and enlarge the list on the copy machine and print several copies. I then mount them on cardstock and laminate them. I also create blank header pieces which I also laminate.
I then have 4-6 lists and headers stapled to the wall.  When I make my resources for my TpT store I usually include a "header" with each game or resource (you can type up your own as well). I mount and laminate a header or title for each center. Soon my center wall (I have one for language arts and another for math) looks like this.
I add velcro to each of the heading pieces as well as the backs of the center names.
I hang a vis-a-vis marker on a string by the lists.
I choose which centers I want to make sure that my kiddos visit that week and place the title pieces on each header.
Now, as each student completes a particular center they use the vis-a-vis pen to make a check mark by their name. At the end of the week, I can quickly wipe off the check marks with a wet tissue, and change the headers for next week's centers, and am ready to go!                                                                

I have, of course, modeled how to record their progress and I normally have an accountability piece (worksheet, project, or writing) for each center. My kiddos also know that I check to make sure they they have indeed completed all that center's requirements before checking off their name. This system works well for me, whether I am teaching kinder or first grade. Perhaps you can adapt it to be helpful for managing your centers as well.
Chery


Friday, April 13, 2012

Workbook Pages Time Saver

Here is a little tip that has saved me a great deal of time and a few headaches as well. If your program uses workbooks like mine does, there is always a "What page are we on?" "I can't find it." whether I am currently teaching kinder or first.
What I do is train my firsties (I usually do it myself for the kinders) to snip the edges of the last work pages we do. That way, next time in order to get to the right page quickly all the student has to do is to hold down the unclipped pages in the corner, and flip the book open, and there it is!
It is a simple little tip that you may already use, but if not, try it. It's sure to save time and maybe just a bit of sanity!
Chery
Chery

Tuesday, April 10, 2012

Super Simple Sight Word Game

Here is a game that is an absolute favorite with my kids.

 It can be used all year depending on the difficulty of the words you use. All you need is a bell (a desktop kind like hotels have) and some sight word cards. You need a double set of cards with 2 of each word.
The object is to collect as many pairs of sight word cards as you can. Students spread the cards out, face up, with the bell in the middle. I like to use double sided (the word can be read from either direction) cards. I have two sets that are currently free in my TpT store if you want to download them from there. Look under Sight Word Playing Cards set 1 and set 2.
Students search for matching pairs of words at the same time. Whoever spots a pair picks up the two cards, says the word out loud and then hits the bell (ONE time). They put the pair aside, and then race to find the next pair.  Students do not need to take turns, its first come, first get! It can get a little noisy but the students get so excited to play. It really helps them develop automaticity in reading their sight words.
It's so easy to set up, but a practice center that they will ask for all year. Later I use the same "game" to have them match sentences and corresponding pictures.
Find yourself a bell (Office Depot and Staples have them) and I guarantee that it will be a resource you'll use over and over again!
I hope your students enjoy this game as much as mine do (this one and Smack-a-Bug Sight Words are perennial favorites). And remember, each time the bell rings it's another word practiced!
Chery


Thursday, April 5, 2012

Classroom Math Wall

One of the most important daily activities that we do in my first grade classroom is our morning meeting/calendar time/math wall. During this daily period of time we cover so many math concepts and practice math activities that I feel are so crucial to first grade math development. Just a few of the daily activities that we do include: skip counting (by 2, 5, 10, odds, 25), daily patterning, tally marks, counting to 100, counting on fingers, and showing the date using coins.  At some point I hope to go into further depth on some of these activities, but for now I just want to share with you my Daily Piggy Bank.
(piggy bank #1)

Here is a snapshot of my current wall.  I have had so many other teachers ask me about my "piggy bank" that I decided to create one to share.  I have been trying to post it in my TpT store but am having difficulty right now because it is so photo intensive. Since I have it ready to go, I wanted to be able to share it here, in case it takes a while for me to figure out how to upload it to TpT (as many of you know, when it comes to technology -- I am roadkill on the proverbial Information Superhighway!).
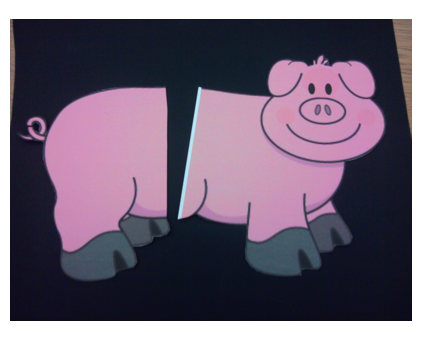
In my file you will find 2 kinds of piggy banks to choose from. I couldn't decide which one I liked better (my friends were split between the two) so I just decided to include both of them.

                                              (piggy bank #2)


My download includes the two types of piggy banks, and a couple of pages of large realistic coins.
To make either (or both)  of the piggy banks, print out the two halves of each on cardstock, trim and overlap the pieces so that you have a single piggy bank.
(If you decide on doing the kind of pig directly above, make sure that you draw the coin slot on before laminating.)

After joining the halves together, I glue the whole thing to sturdy posterboard for durability.
After laminating and trimming, add velcro dots to the pig. I use the clear craft dots that you can find at WalMart or a craft store. They are wonderful, and you can hardly see the dots on the pig. Here is a close up of my pig with the dots attached.
See how you can barely see the dots? On the back of the coins I use the other heavier kind of velcro as it seems to be easier for little hands to manipulate.
Everyday a different student is chosen to show the date on the pig in coins. So on the 15th of the month the pig will have 15c showing.
It is wonderful reinforcement for coins and later in the year, students learn to exchange coins or use different denominations of coins to make up the dates.
I hope you find this useful in your class. In addition to printing out the coins for the date, you might want to print and laminate extras as they are very handy for math lessons, or for Board Math for those of you who do that.
Here is the link to my Coin Counting Piggy Bank. Enjoy!
Chery